Product Features:
BGA Kit Reballing-Flux Paste
1,new
2,1 year warranty
Business Terms:
Port: FOB Shenzhen
Minimum Order Quantity: 1 Piece/Pieces
Supply Ability: 500 Piece/Pieces per Day
Payment Terms: T/T,Western Union,paypal
Contact Supplier
BGA Kit Reballing-Flux Paste
1,new
2,1 year warranty
Port: FOB Shenzhen
Minimum Order Quantity: 1 Piece/Pieces
Supply Ability: 500 Piece/Pieces per Day
Payment Terms: T/T,Western Union,paypal
Contact Supplier
Packaging Detail: standard packing
Delivery Detail: 1-3 days after we received the payment
BGA Kit Reballing-Flux Paste
1.Condition: new
2. Warranty: 1 year warranty
We have the BGA Kit Reballing in stock, pls contact with us freely!
Repair BGA's, Here's Ten Simple Steps!
1. First, apply a thin film of a very tacky, no clean flux ( included in the Kit!) over the entire grid area of the Ball Grid Array or Chip Scale Package using an anti-static foam swab (SFS-A-0050 included in kit!) shown as below.
2. Choose the appropriate Re-Balling Screen (from your Kit) for your BGA pattern. Place your fluxed component on the underside of your Re-Balling Screen. Make sure that your component and the Screen are squared. We probably have the Screen/Stencil for your particular BGA here in our factory. If not, we can in a very short time.
3. Now, position your Re-Balling Pan (included in kit!) under the Re-Balling Screen. Place the component into the Re-Balling Pan so that the handles of the Re-Balling Screen lie directly above those of the Re-Balling Pan. As shown as below.
4. Remove lid from Re-Balling Tank (included in your Kit). Place Re-Balling Pan unit into the grooves of your Re-Balling Tank. Pour appropriate Solder Spheres (included in kit!) onto Re-Balling Screen. Holding both handles, rotate left & right dumping any excess spheres into the Tank.
5. Either turn on your Air Pick, place a Re-Balling Needle Tip (included in the kit!) of a smaller size then your Solder Spheres on the end of the AirPick.
6. Now, use your AirPick to remove any extra Solder Spheres that you have left. Also use your AirPick to fill in any holes on your Re-Balling Screen as shown here.
7. Place the Re-Balling Platform (included in Kit!) into your Board Cradle. Position the the Cradle in front of your ZT-7-MIL. Now, simply place the Re-Balling Pan and Re-Balling Screen on top of the ReBalling Platform using the convenient handles as shown in the photo at the left.
8. Next lower the Z-axis heating zone of the ZT-7-MIL down to where the hot air nozzle is approximately 1/8" or 3mm above the Re-Balling unit. Set the countdown timer to 1:20. Set your top temperature to 230ºC. Start the timer and the heating from above.
9. Yes! The picture at the left says it all. When the timer begins to beep, turn off top heater. As the Re-Balling unit cools, carefully separate the component out from the screen as shown in the photograph at the left. (Caution: The Re-Balling unit may still be hot.) Inspect your component and you are ready for final cleaning.
10. Final Cleaning: Dip one of your Brushes (included in Kit!) into the non-flammable flux remover Generously apply the flux-remover throughout the component until all of the old flux has been stripped away. Inspect.

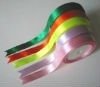
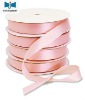
Model No.: R60732
Features: satin ribbon
superior durability
customized colors,designs,specifications are available
make free logo if there have not logo
Model No.: R60741
Features: double sided ribbon
superior durability
customized colors,designs,specifications are available
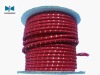
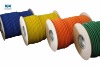
Model No.: EC60822
Features: elastic cord
superior durability
customized colors,designs,specifications are available
cheap,hot
Model No.: EC60333
Features: elastic cord for tent
superior durability
cheap.hot
customized color,design and specifications are available
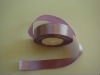
Model No.: R60741
Features: satin ribbon
superior durability
customized colors,designs,specifications are available
make free logo if there have not logo

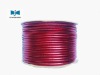
Model No.: EC60821
Features: elastic cord
superior durability
customized colors,designs,specifications are available
cheap,hot

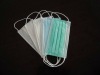
Model No.: T60274
Features: bookmark tassel
we can make it by the customers' detailed requirements in different color,size and other requirements
Model No.: E60079
Features: elastic rubber rope
high quality with low price
on time delivery
direct factory
Model No.: EC60331
Features: polyester elastic cord
superior durability
cheap.hot
customized color,design and specifications are available

Model No.: T60067
Features: bookmark tassel
high quality with low price
on time delivery
direct factory
superior durability

Model No.: T60668
Features: bookmark tassel
we can make it by the customer's detailed require in different colors,size,materail and other requirements.
Model No.: R60071
Features: satin ribbon
superior durability
customized colors,designs,specifications are available
make free logo if there have not logo